Dual monitors offer an undeniable boost to productivity and multitasking. Whether you’re a creative professional, a hardcore gamer, or simply crave more screen real estate, Windows 11 makes setting up dual monitors a breeze. This guide will walk you through the process, ensuring you can leverage the full potential of your extended desktop.
The Hardware Essentials: Preparing Your Gear
Before diving into software settings, ensure you have the necessary hardware:
- Second Monitor: This is the star of the show! Choose a monitor compatible with your computer and with a suitable connection method (HDMI, DisplayPort, etc.).
- Connecting Cable: Select the appropriate cable to connect your second monitor to your computer. Refer to your monitor’s manual for specific recommendations (HDMI or DisplayPort are common choices).
- Additional Ports (Optional): If your computer lacks enough video output ports, you might need a docking station or adapter to connect both monitors.
Power Up and Connect: The Physical Setup
- Power On: Turn on both your computer and your second monitor.
- Connect the Monitors: Using the chosen cable, connect your second monitor to an available video output port on your computer. Consult your computer’s manual if unsure about compatible ports.
- Organize the Monitors (Optional): Physically arrange the monitors on your desk for optimal viewing comfort. You can even adjust the height and tilt for better ergonomics.
Windows Detects Your Second Monitor: A Helping Hand
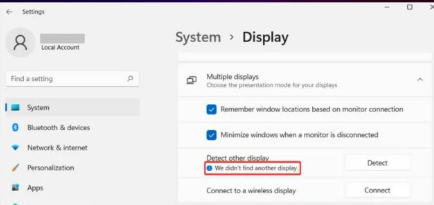
Windows 11 is usually smart enough to automatically detect your second monitor. However, if it doesn’t, here’s a quick fix:
- Right-click the Desktop: Bring up the context menu by right-clicking anywhere on your desktop background.
- Navigate to Display Settings: Select “Display settings” from the menu that appears.
Configuring Your Dual Monitors: The Software Magic
Now comes the software configuration to customize your dual-monitor experience:
- Multiple Displays Section: Within the Display settings window, scroll down to the “Multiple displays” section.
- Identify Your Monitors: You’ll see a representation of your monitors on the screen. Click the “Identify” button to easily differentiate between them (numbers will be displayed on each monitor).
- Choose Your Display Arrangement: Drag and drop the monitor representations to match their physical arrangement on your desk. This ensures your mouse cursor seamlessly moves between screens in the correct direction.
- Extend or Duplicate (Choose Your Weapon): Under “Multiple displays,” select your preferred display mode:
- Extend: This creates an expanded desktop, allowing you to drag windows and applications across both monitors. Ideal for multitasking.
- Duplicate: This mirrors your main monitor’s display onto the second monitor. Useful for presentations or sharing your screen.
- Set the Main Display (Optional): Choose which monitor will be your primary display, where windows open by default. This can be beneficial for organizing your workflow.
- Advanced Display Settings (Optional): Click on “Advanced display” for further customization options like setting the resolution and refresh rate for each monitor individually.
The Final Touches: Optimizing Your Dual Monitor Setup
With the basics covered, here are some additional tips to get the most out of your dual-monitor setup:
- Taskbar Tweaks: Right-click on the taskbar and consider options like “Show taskbar on all displays” or “Show taskbar buttons on all displays” for convenient access from either monitor.
- Snap Assist: This handy feature helps you organize windows by snapping them to specific screen sections. Enable it in System Settings > Multitasking > Snap Assist.
- Personalize Your Wallpaper: Spruce up your desktop with a panoramic wallpaper that stretches across both monitors for a cohesive look.
Embrace the Multi-Monitor Life!
By following these steps and exploring customization options, you’ll be well on your way to mastering your dual-monitor setup in Windows 11. Enjoy the increased productivity, the expansive workspace, and the overall enhanced computing experience that dual monitors offer!